 Save
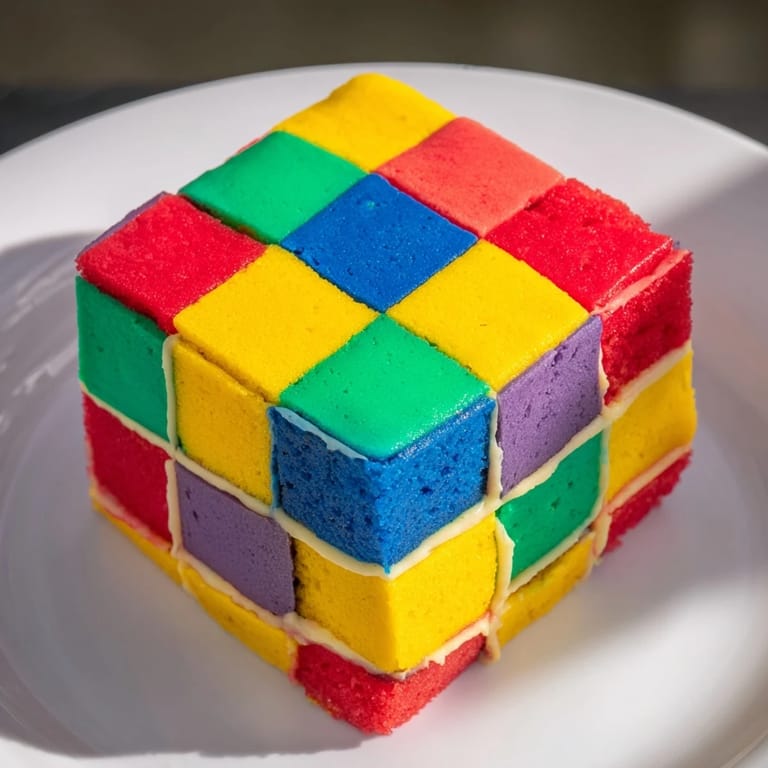
Save I'll never forget the afternoon my grandmother pulled out a faded photograph of her childhood quilt, and I realized I wanted to bake something that captured that same feeling of warmth and nostalgia. That's when the Cozy Quilt Patchwork Cake was born—a dessert that's not just beautiful, but tells a story with every colorful square. The first time I assembled it, my hands trembled slightly as I arranged those vibrant sponge pieces, knowing that something special was taking shape on my kitchen counter.
I made this cake for my best friend's housewarming party, and watching her face light up when she saw the patchwork pattern was worth every minute spent arranging those careful squares. Three people asked for the recipe before dessert was even finished, and I knew right then this would become the cake I'd make again and again.
Ingredients
- All-purpose flour (350 g): The foundation of your tender crumb; sift it gently to avoid overworking the batter, which would make your sponge dense instead of cloud-light.
- Granulated sugar (300 g): This dissolves into the butter, creating that signature light and fluffy texture that makes every bite melt on your tongue.
- Baking powder (2½ tsp): Don't skip measuring this precisely; too little and your cakes won't rise properly, too much and they'll dome and crack.
- Salt (½ tsp): A pinch that elevates the sweetness without announcing itself, making the flavors sing.
- Unsalted butter (250 g for cake, 350 g for frosting): Softened to room temperature—this is non-negotiable for creaming; cold butter creates lumps that won't incorporate properly.
- Large eggs (4): Room temperature eggs blend seamlessly into the batter, creating structure and richness; cold eggs can cause the mixture to seize.
- Whole milk (250 ml): Adds moisture and tenderness; whole milk creates a richer crumb than skim ever could.
- Vanilla extract (2 tsp for cake, 2 tsp for frosting): Pure vanilla matters here—it's the quiet note that ties everything together.
- Food coloring gels (red, yellow, green, blue, purple): Gel colors are your secret weapon; they don't thin the batter like liquid colors do, keeping your sponge perfect.
- Powdered sugar (500 g): Sifted before adding to your frosting ensures a silky, lump-free spread that glides over your cake.
- Milk for frosting (3–4 tbsp): Adjust gradually until your buttercream reaches the perfect consistency—thick enough to hold shape, soft enough to pipe.
Tired of Takeout? 🥡
Get 10 meals you can make faster than delivery arrives. Seriously.
One email. No spam. Unsubscribe anytime.
Instructions
- Prepare Your Canvas:
- Preheat your oven to 180°C (350°F) and give those five square pans a loving coat of butter and parchment paper. If you don't have five pans, don't worry—bake in batches and your patience will be rewarded with uniform, gorgeous squares.
- Create the Creamed Base:
- In your largest bowl, beat the softened butter and sugar together until it looks like pale sand mixed with clouds. This takes about three minutes of steady beating. Add each egg one at a time, letting each one fully disappear into the mixture before welcoming the next. Pour in your vanilla and listen for that moment when everything becomes silky and light.
- Combine Dry Elements:
- In a separate bowl, whisk your flour, baking powder, and salt together gently. This aerates the flour and distributes the leavening evenly—it matters more than you might think.
- Marry Wet and Dry:
- Now comes the gentle dance: add about a third of the flour mixture to your wet ingredients, stir until just barely combined, then add half the milk. Repeat with another third of flour and the rest of the milk, finishing with the final flour portion. Stop as soon as you don't see white streaks anymore. Overmixing here is the enemy of tender cake.
- Paint With Color:
- Divide your batter evenly into five bowls—I use a kitchen scale to make sure each gets exactly 1/5th. Add a different gel color to each bowl, stirring gently until the color is even and vibrant. Watch as your neutral batter transforms into jewel tones.
- Bake Your Colorful Layers:
- Pour each colored batter into its prepared pan, using an offset spatula to spread it into an even layer. Slide them all into the oven and set your timer for 20–25 minutes. You'll know they're done when a toothpick inserted in the center comes out clean and your kitchen smells like buttery heaven.
- Cool With Patience:
- Let the cakes rest in their pans for 10 minutes—this helps them set without being fragile. Then turn them out onto cooling racks and give them time to come completely to room temperature. This is when I make the buttercream.
- Prepare Your Frosting:
- Beat the soft butter until it's pale and creamy, then gradually add your sifted powdered sugar a little at a time while beating constantly. This prevents cloudy streaks and creates the smoothest texture. Add vanilla, salt, and milk gradually until you have a frosting that's thick but spreadable—soft peaks when you lift the beater.
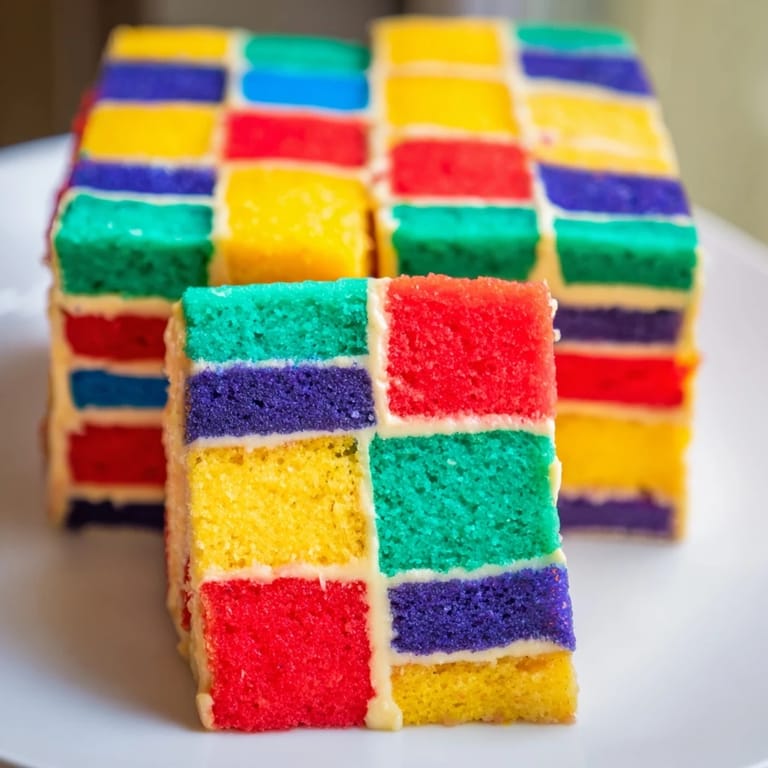
- Cut Your Quilt Squares:
- Once the cakes are completely cool, trim the edges gently to make them neat, then slice each colored sponge into uniform 3 x 3 cm squares. A sharp serrated knife and a light touch are your friends here.
- Assemble the Patchwork:
- On your serving tray, begin arranging the colored squares in a checkerboard pattern, using a thin layer of buttercream between each piece like edible glue. Build your layers, alternating colors as you go, creating a beautiful quilt pattern that rises higher and higher. This is the part where you become an artist.
- Final Frosting and Chill:
- Spread a thin, smooth layer of buttercream over the entire cake—top and sides—then chill for 30 minutes before slicing. If you're feeling fancy, pipe buttercream lines along the seams to emphasize the patchwork effect.
 Save
Save The moment that made this cake truly special was serving it to my mother and watching her trace the patchwork pattern with her finger, remembering the actual quilt her grandmother made by hand. I realized then that food is memory made edible, and suddenly I understood why she'd always said that baking was an act of love.
The Art of Color in Baking
When I first tried this cake with liquid food coloring, I was devastated—the colors were muddy, the sponge was dense, and I couldn't figure out what went wrong. Then a baker friend introduced me to gel colors, and everything changed. The vibrant reds, yellows, and blues stayed true without diluting my batter. Now I keep a small set of gel colors in my baking drawer like precious jewels. The difference between a pale, heavy cake and a light, vibrantly colored one often comes down to this single choice.
Building Height and Stability
The patchwork effect works because of how you stack the squares—each layer is supported by buttercream that acts like mortar between bricks. I learned to apply just enough frosting to hold pieces together without creating thick, gluey layers that make each bite overly sweet. A thin layer between each square creates a cake that's structurally sound but lets the tender sponge shine. Build slowly, press gently, and let gravity help you—rushing this step leads to leaning towers and toppling squares.
Storage, Serving, and Simple Variations
This cake lives happily in an airtight container for three days, with the sponge actually improving as the buttercream has time to set in and keep everything moist. I've found that a serrated knife dipped in hot water and wiped dry between cuts creates the cleanest slices—nobody wants torn edges on their beautiful patchwork creation. For extra flavor dimensions, I sometimes add orange zest or almond extract to the sponge batter, which adds a subtle sophistication without overwhelming the delicate crumb. A generous dollop of whipped cream or a handful of fresh berries on the side transforms each slice into something even more special.
- Make this cake gluten-free by swapping in a quality 1:1 gluten-free flour blend—the results are surprisingly tender and delicious.
- Plan ahead: you can bake the sponges and frosting a day before assembly, making the day-of work much more manageable.
- If you're short on time, use just three colors instead of five for a simpler but equally beautiful effect.
 Save
Save Every time I pull this cake from the kitchen, I'm reminded that the most meaningful desserts aren't always the ones that are fastest or easiest to make—they're the ones we take time to create with intention and love. This colorful patchwork is proof that a little patience and careful assembly transform simple ingredients into something truly unforgettable.
Recipe Help & FAQs
- → How do I achieve the vibrant colors in the sponge?
Use gel food coloring to tint the batter in separate bowls before baking. This maintains batter consistency and ensures bright, vivid hues.
- → Can I bake all sponge layers at once?
If you have enough square pans, bake all layers simultaneously; otherwise, bake in batches to maintain even cooking.
- → What is the best way to assemble the patchwork design?
Trim the sponge into uniform squares and arrange alternating colors on a tray, adhering layers with a thin buttercream spread for stability.
- → How should I store the finished cake?
Store the cake chilled in the refrigerator to keep the buttercream firm, and bring to room temperature before serving for best texture.
- → Are there any ingredient substitutions for dietary needs?
You can try a gluten-free flour blend instead of all-purpose flour for a gluten-free option without compromising texture.